Showing posts with label pattern. Show all posts

Tuesday, July 15, 2014

The Elyce Knit Cowl

Hello!

I am pretty excited about this pattern!
For the reason that, it is my first knit pattern.
I have named it after my knitting teacher, Elyce.  I will never be able to thank her enough for teaching me how to knit.  She is a fabulous teacher, and has also become a great friend.

This is the first Elyce cowl I knit.
Since it turned out to be a bit too snug for an adult, I just said it is child size.  Then had my adorable little cousin, Poppy, model it for me.

I was interested in what the Elyce cowl would look like, if I made it with two different colors - not to mention I had to make an adult size version.

That's when this beauty came to be!  It is by far, one of the favorite items I have made so far.


I am lucky to come from such a good looking family - and that they are willing to model my handmade items.
My model/cousin, Alisa, will need this cowl too, when she goes back to college in Wisconsin this Fall.

Here you can see more of the detail.
This is seriously a super easy pattern, and delivers such an awesome look!


I even made one for myself with yarn I received for my birthday.

If you want to make your own Elyce cowl, you can get the pattern here.
If you want me to make an Elyce cowl for you, then click here.

Stay tuned for more patterns - coming soon!

Don't forget to subscribe to the ChirpinBirdie blog, so you get the news, and new patterns first!


Friday, January 10, 2014

Chunk Lace Cowl

The Chunk Lace Cowl Pattern is no longer available as a free pattern.
Though, it is still available in the ChirpinBirdie Etsy shop!


Best Wishes,
Alison


Monday, September 30, 2013

An Afghan of My Very Own

So, if you follow me on Instagram, then you know that I have been working on some squares lately.  Well, they are all done, all put together, all the ends sewn in, a border crocheted around, and I not am the proud owner of my very own afghan!


The blanket measures 66"x83" and looks fabulous on my full sized bed...if I do say so myself.

I am so ecstatic about the way this afghan turned out.  It is made with 30 squares, and no two squares are the same.
The morning after the first night I was able to sleep with it, I was so happy when I woke up and saw what was on my bed.  I had kinda forgotten that I had a brand new snazzy blanket to cuddle with.

I think Jixer was pretty happy about it too!


This project did not start out to be a project to make myself a blanket, but a few squares in, I knew that I wanted this blanket all to myself...well, I will share with Jixer, but that is it!

This is when I fell in love, and I knew that I was going to be keeping this blanket all for myself.

I fell in love with this blanket even more once I started crocheting squares with multiple colors.
This is my favorite square of the blanket.


The square I am talking about, the one that I fell in love with, and the one that makes me so happy, is the In Treble Afghan Square by Julie Yeager.  Julie, I don't know who you are, but I know that I love you!  I rarely buy a pattern (this is my 4th ever pattern purchase in the 12 years that I have crocheted), but I really wanted this pattern, and it is only $1.99.  It is so worth every penny!

I followed the pattern to a tee, except I left off the last round of hdc.  For each of my squares, I used the same color yarn for the first row of hdc, and used Red Heart Super Saver in Aran. I also used this same yarn to join the squares with the flat braid join, as well as for the scalloped border.

This was a stash busting project for me, so the squares are a mixture of Red Heart Super Saver, Red Heart with Love, Red Heart Soft, Loops and Threads Impeccable, Craft Smart, and  Vanna's Choice.

Here is the progression of my blanket in photos...

The first square

The only variegated square in the blanket

First photo after I decided to add a row of hdc of Aran.

They are starting to pile up!

I never realized how pretty this color was until I crocheted it with the In Treble pattern.

Jixer is always around to help!  We were trying to figure out the layout of the squares.

All the squares are done and just waiting to be joined.

All joined and waiting for a border.

This afghan is by far my favorite that I have ever crocheted.  I hope you all have some exciting projects going on.  Remember, that I take custom orders at all times for crochet items.

Have a splendiferous day everyone!

Best Wishes,
Alison


Wednesday, September 11, 2013

Racing Arrow Beanie

Happy Hump Day!

I am so excited about this post!  I have designed a new beanie, and am thrilled to share the pattern with all of you.

This pattern might seem intimidating to some, but I assure you, it is easy. Especially when you get into the groove of the pattern.  I took lots of progress shots, and will include those below the pattern.  Hopefully, they will help you, in case you have any questions.

So here it is!


Materials:
5mm crochet hook
Two colors of worsted weight yarn
Scissors
Large Needle

Pattern Notes:
·         Pattern is best worked with two colors, alternating every other row.  When changing from ‘Color A’ to ‘Color B’, do not fasten off yarn!  Carry the yarn up through the inside of the beanie.
To change colors: Work the last dc/Ldc as normal until the last two loops are on the hook, drop the current color of yarn and pick up second color pulling through last two loops on your hook, completing the stitch.
·         Starting at Round 2, the beginning ch 4 of each row counts as first dc and ch1 of the first V stitch.
·         When working a long double crochet (Ldc), remember that they are worked into the stitches, of the same color, two rows below (ie: the Ldc’s in row 5 are worked into the stitches from row 3, row 8 into row ).  If you do not know how to make a Ldc, click here for a YouTube video that will show how.

Abbreviations:

sl st – slip stitch
ch – chain
dc – double crochet
hdc – half double crochet
V stitch – (dc, ch1, dc) in same space
Ldc – long double crochet
beg – beginning

Pattern:

Ch 3

Round 1: 12 dc in 3rd chain from hook, sl st into top of first dc

Round 2: ch4, 1 dc in first dc, V stitch in each dc around, sl st into 3rdch of beg ch4

Round 3: sl st into ch1 space, ch4, dc in same space, *1Ldc between next to dc, V stitch in next ch1 sp** repeat from *to** around, ending with Ldc between last dc and beg ch3, sl st into 3rdch of beg ch4 (12 V stitch, 12 Ldc)

Round 4: sl st into first ch1 space, ch4, dc in same space, *1Ldc between next dc and Ldc from previous row, 1Ldc between Ldc and next dc from previous row, V stitch in next ch 1 space** repeat from *to ** around, ending with 1Ldc between last Ldc and ch 4 of previous row, sl st into 3rdch of beg ch4 (12 V stitch, 24 Ldc)

Round 5: sl st into first ch1 space, ch4, dc in same space, *1Ldc into each of the next 3Ldc from two rows down, V stitch into next ch1 space** repeat from *to** ending with 1Ldc in last Ldc two rows down, sl st into 3rdch of beg ch4 (12 V stitch, 36 Ldc)

Round 6: sl st into first ch1 space, ch4, dc in same space, *Ldc into each of the next two Ldc from two rows below, V stitch into next ch1 space** repeat from *to** ending with 1Ldc in last Ldc from two rows down, sl st into 3rdch of beg ch4 (12 V stitch, 24 Ldc)

Rounds 7-17: repeat rows 5 and 6, ending with row 5

Round 18: sl st into first ch1 space, ch1, hdc in each of the next 3 stitches, *Ldc into next Ldc from two rows below, 1hdc in next stitch, 1 Ldc in next Ldc from two rows below, 1hdc in each of the next 5 stitches** repeat from *to** around, end with Ldc in last Ldc from two rows down, sl st into first hdc.


Fasten Off and weave in ends.

As promised, here are some photos to help you out!

Changing Colors
1 - Complete last dc of row until only two loops left on hook
2 - Pull new color through last two loops leaving one loop of new color on hook
3 - Slip Stitch into directed stitch to close round
*When crocheting the initial 12 dc in the 3rd chain from the hook, crochet around the beginning tail.  Once you have slip stitched into the top of the 1st dc, pull the tail, and this will close the center hole.  Sew the tail around the center to keep it closed.*


Round 3
This is the first round where you need to crochet Ldc
The Ldc from this round are worked into the 12 double crochets from the first round.


Round 4
This is the first round working Ldc in the second color.
The Ldc from this round are worked into the top of the dc in the Vstitches from Round 2.  The last Ldc is worked into the ch3 from the beginning of Round 2.


Round 5
The first Ldc of each section is worked into the top of the dc in the Vstitch from Row 3.
The middle Ldc of each section is worked into the top of the Ldc from Row 3.
The last Ldc of each section is worked into the top of the dc in the Vstitch from Row 3.


After Row 5, the Ldc of each round are worked into the Ldc of the round 2 rows below (the last round of the same color you are currently working with.

I really hope you guys enjoy this pattern!

As with all my patterns: Feel Free to crochet for personal use, and to sell. All I ask is that you cite the pattern using this ChirpinBirdie blog.  The pattern itself is not to be redistributed, or sold.  If someone wants the pattern, again, please direct them back to this blog.


Best Wishes,
Alison


Sunday, May 12, 2013

Feathered Yoga Mat Bag

Happy Saturday!

It has only been a few days since I came up with this pattern, but because I was struck down with a vicious cold, it seems like it has taken me forever to type it up for you guys.  I am feeling better, and am enjoying a nice cuppa while writing this post.

This is by far my favorite yoga mat bag that I have made...so much so, that I am keeping this blue one for myself!


You will need:
7 ounces/ 240 yards of worsted weight yarn
5.0 mm crochet hook
large needle
scissors

Abbreviations:
ch - chain
sl st - slip stitch
sc - single crochet
hdc - half double crochet
dc - double crochet

Strap Pattern:

ch 8

Row 1: hdc in second ch from hook and in each ch across (7hdc)

Row 2: ch 1, sc in first st, skip 2 stitches, 7 dc in next stitch, skip two stitches, sc in last stitch

Row 3: ch 6 (counts as first dc and chain 3), sc in 4th dc of 7dc cluster from previous row, ch 3, dc in last sc

Row 4: ch 1, sc in first stitch, 7 dc in sc from previous row, sc in 3rd chain from turning chain of previous row

Repeat rows 3 & 4 until you have 16 total fans (7dc clusters), end with a row 3

Last Row: ch 1, hdc in first stitch and in next 6 stitches across, fasten off (7hdc)

Bag Pattern:

ch 2

Round 1: 8 hdc in second ch from hook, sl st into first hdc (8hdc)

Round 2: ch 1, 2 hdc in each stitch, sl st into first hdc (16 hdc)

Round 3: ch 1, (1 hdc in first stitch, 2 hdc in next stitch) repeat 7 times, sl st into first hdc (24 hdc)

Round 4: ch 1, (1 hdc in first two stitches, 2 hdc in next stitch) repeat 7 times, sl st into first hdc (32 hdc)

Round 5: ch 1, (1 hdc in first 3 stitches, 2 hdc in next stitch) repeat 7 times, sl st into first hdc (40 hdc)

Round 6: ch 1, (1 hdc in first 4 stitches, 2 hdc in next stitch) repeat 7 times, sl st into first hdc (48 hdc)

Round 7: ch 1, sc in same space, *skip two stitches, 7 dc in next stitch, skip two stitches, sc in next stitch* repeat from *to** around ending with a 7dc cluster and sl st into first sc

Round 8: ch 6 (counts as first dc and ch 3), *sc in 4th dc of 7dc cluster, ch 3, dc in next sc, ch 3** repeat from *to** around ending with sc in top of 7dc cluster, sl st into 3 ch of beginning chain 6

Round 9: ch 3 (counts as first dc), 6 dc in same space, *sc in sc from previous round, 7dc in dc from previous round** repeat from *to** ending with sc in last sc, sl st into 3rd ch from beginning ch 3

Repeat rows 8 & 9 until bag measures about 25" (or long enough to accommodate your yoga mat). I also ended with a row 9 repeat, so my bag has a pretty scalloped edge.


I hope you guys enjoy this pattern! 

As always, feel free to use this pattern for your personal use.  You may also sell finished products you make with this pattern, but please, link back to this blog as the source of the pattern.  Thank you kindly!

~Best Wishes~


Thursday, May 9, 2013

Fun Flower Coaster

Happy Thursday!

I hope this blog post finds you well...or that when you found this blog post, you are doing well...you know what I mean! I hope that you are happy and healthy!

I was recently part of a handmade coaster swap through Instagram, and found a cute owl coaster pattern to send to my partner.

The pattern for this coaster can be found here.


This got me in the coaster making mood, so last night I decided to make myself one.  But I did not want an owl...I know, I know, they are the 'in' thing right now, but they are not MY thing.  So I didn't know what I wanted, but my water for tea was already on to boil and I needed a coaster FAST!

So, I sat down and just started to crochet and came up with this.


It is very simple, and only takes a few minutes to make.

You will need:
Small amount of 3 different colors of worsted weight yarn
5.0 mm crochet hook
Scissors
Large needle

Abbreviations:
ch - chain
sl st - slip stitch
sc - single crochet
hdc - half double crochet
dc - double crochet

Pattern:

Round 1: ch 4, in 4th ch from hook dc 11 times, sl st in top of ch 3 to form circle.  FO

Round 2: with CB, sl st between any two dc from previous round, ch 3 (counts as first dc) and dc in same space, in next space and in each space around 2 dc, sl st into top of ch 3, FO (24 dc, all worked in the space between the dc from previous round)

Round 3: with CC, slip st into any dc from previous round, ch 1 *hdc in first stitch, 2 hdc in next stitch** repeat from *to** around, DO NOT fasten off (36 hdc)

Round 4: ch 1, *sc in first stitch, skip two stitches, 7 dc in next stitch** repeat from *to** around. sl st into first sc, FO

Sew in your ends and you have cute little flower coaster.

I hope you all enjoy this pattern!

Feel free to use this pattern for personal use.  You may also sell the finished items you make with this pattern, but be sure to reference back to this blog for the pattern.  Thank you kindly!

~Best Wishes~

Friday, March 8, 2013

Ridiculously Easy Yoga Mat Bag

Happy Friday Everyone!

It has been too long since my last post, but I am happy to be writing for you guys today, because I have another crochet pattern to share.

I recently got back in touch with an old friend, and yesterday was her birthday.  I love giving handmade gifts, and thought a yoga mat bag would be perfect, since she is now a yoga instructor.

I have posted a yoga mat carrier pattern before, called the Bubble Yoga Mat Bag, but I wanted something that made a solid fabric.  All of the circles in the Bubble Yoga Mat Bag look awesome, but they can also be a hassle when quickly trying to get the mat into the bag.  I also wanted something where I didn't have to pay so much attention to the pattern.
So, I thought: 'What is my favorite crochet stitch?'

Of course!  Let's do a bag that is completely half double crochets!  Nothing can be more simple!  It is so simple, it is hardly worth calling this a pattern.


You will need:
275 yards of worsted weight yarn
4.5mm crochet hook
scissors
large needle

Abbreviations:
ch = chain
sl st = slip stitch
sc = single crochet
hdc = half double crochet

Pattern Notes:
I recommend making the strap first and sew the first end to the bag before the bag gets too long (around row 16).  This just makes it easier to sew on.
I used an entire skein (244 yards/7oz) for the actual bag, and used scrap yarn in a complimentary color for the strap.


Strap Pattern:

Ch 51

Round 1: In second chain from hook, 2 hdc in first stitch, 1 hdc in each of the next 48 chains, 5 hdc in last chain, (continue working on the unused side of the chain) 1 hdc in each of the next 48 stitches, 3 hdc in last
chain, sl st into first hdc

Round 2: ch 2, 1 hdc in each of the next 52 stitches, 3 hdc in next stitch (should be the 3rd stitch from the set of 5 hdc in last row), 1 hdc in each of the next 52 stitches, 3 hdc in last hdc, sl st into first hdc

Fasten off and weave in ends


Bag Pattern:
ch 2

Round 1: In second chain from hook, 8 hdc, sl st into first hdc

Round 2: ch 1, (2 hdc in first stitch) repeat 7 times (16 hdc)

Round 3: ch1, (1 hdc in first stitch, 2 hdc in next stitch) repeat 7 times, sl st into first hdc (24 hdc)

Round 4: ch 1, (1hdc in each of the first two stitches, 2 hdc in next stitch) repeat 7times, sl st into first hdc (32 hdc)

Round 5: ch 1, (1 hdc in each of the first three stitches, 2 hdc in next stitch) repeat 7 times, sl st into first hdc (40 hdc)

**Starting from Round 6, do not slip stitch at the end of each round; work continuously around, so there is not seam in your bag**

Round 6 → End: 1 hdc in each stitch (40 hdc/round)

If you feel the need, you can keep track of the rounds as you go, but is not necessary.  I simply just kept crochet around and around until the bag was long enough for my bag.

Last Round: sc in each stitch around (40 sc), sl st into first sc (this make the edge more smooth)

Fasten off and weave in ends

Sew on the top of the strap about 5 rows down from the top of the bag.

I really hope that you guys enjoy this pattern. It is so simple!  This is the perfect mindless pattern to work on and have the music cranked up or your favorite show playing on the TV.

Feel free to use this pattern for personal projects.  You can also make this pattern and sell the finished item for profit, but please, link back to this blog so people know where the pattern came from.

~Best Wishes~
Alison

Friday, February 1, 2013

Big Puff, Little Slouch Beanie

Hello Everyone!

Can you believe January is over?  It is crazy for me to think about, but I am very happy about it because it means that I am that much closer to moving to the Bay Area!!! EEEEKKK!  I am so excited for so many reasons!

Well I don't know if you have noticed yet, but I am crazy for puff stitches lately.  This pattern will solidify my craziness for puff!  I hope you all enjoy.

I am not giving this gray slouch away! It is all mine!

Materials Needed:
5.0mm crochet hook
2-3 oz of worsted weight yarn (Photos feature Red Heart)
scissors
large needle

Abbreviations:
ch - chain
sl st - slip stitch
sc - single crochet
hdc - half double crochet
PS - Puff Stitch
VPS - (PS, ch1, PS, ch1) in same space

Pattern Note:
This pattern is easily worked with one or two colors.
I am working this pattern with two colors so that the stitches are easier to see in photos.  If you would like to work with two colors, pull the new color through the last sl st of the row.  I carried both color up the inside of the beanie, so that there was less ends to weave in.

Pattern:

ch 3, sl st into first ch to form ring

Row 1: ch 2, *PS, ch 1* repeat 6 times, sl st to first PS (7 PS and 7 ch 1 spaces)

Row 2: sl st into first ch 1 sp, ch 1,  (hdc, ch 1, hdc, ch 1) and in each ch 1 sp around, sl st into first hdc (14 hdc and 14 ch 1 spaces)

Row 3: sl st into first ch 1 space, ch 2, *PS, ch 1, VPS in next ch 1 space** repeat from *to** around, sl st into first PS (21 PS and 21 ch 1 spaces)

Row 4: sl st into first ch 1 sp, ch 1, (hdc, ch 1, hdc, ch 1)in first ch 1 space, (hdc, ch1) in next ch 1 space, *(hdc, ch 1, hdc, ch 1) in each of the next two ch 1 spaces, (hdc, ch 1) in next ch 1 space** repeat from *to** around, sl st into first hdc (35hdc and 35 ch 1 spaces)

Row 5: sl st into first ch 1 space, ch 2, (PS, ch 1) in first ch 1 space and in each ch 1 space around (35 PS and 35 ch 1 spaces)

Row 6: sl st into first ch 1 space, ch 1, (hdc, ch 1) in first ch 1 space in each ch 1 space around, sl st into first hdc (35 hdc and 35 ch 1 spaces)

Row 7 - 23: repeat rows 5 and 6

Row 24: sl st into top of first PS, ch 1, *1sc in top of PS, 1 sc in ch1 space** repeat from *to** around, sl st into first sc (70 sc)

Fasten off and weave in ends.

I am in love with this slouch!


Here are some pictures of the first few rows, just in case you need some visualization.

Row 1

Slip Stitch with a different color, if you want to make the two color version.

Row2

Row 3

Close up view of row 4

Complete view of row 4

Row 5

Finished!

My supervisor is never far away.  He always makes certain that I am getting my work done.

~Best Wishes~


Wednesday, January 30, 2013

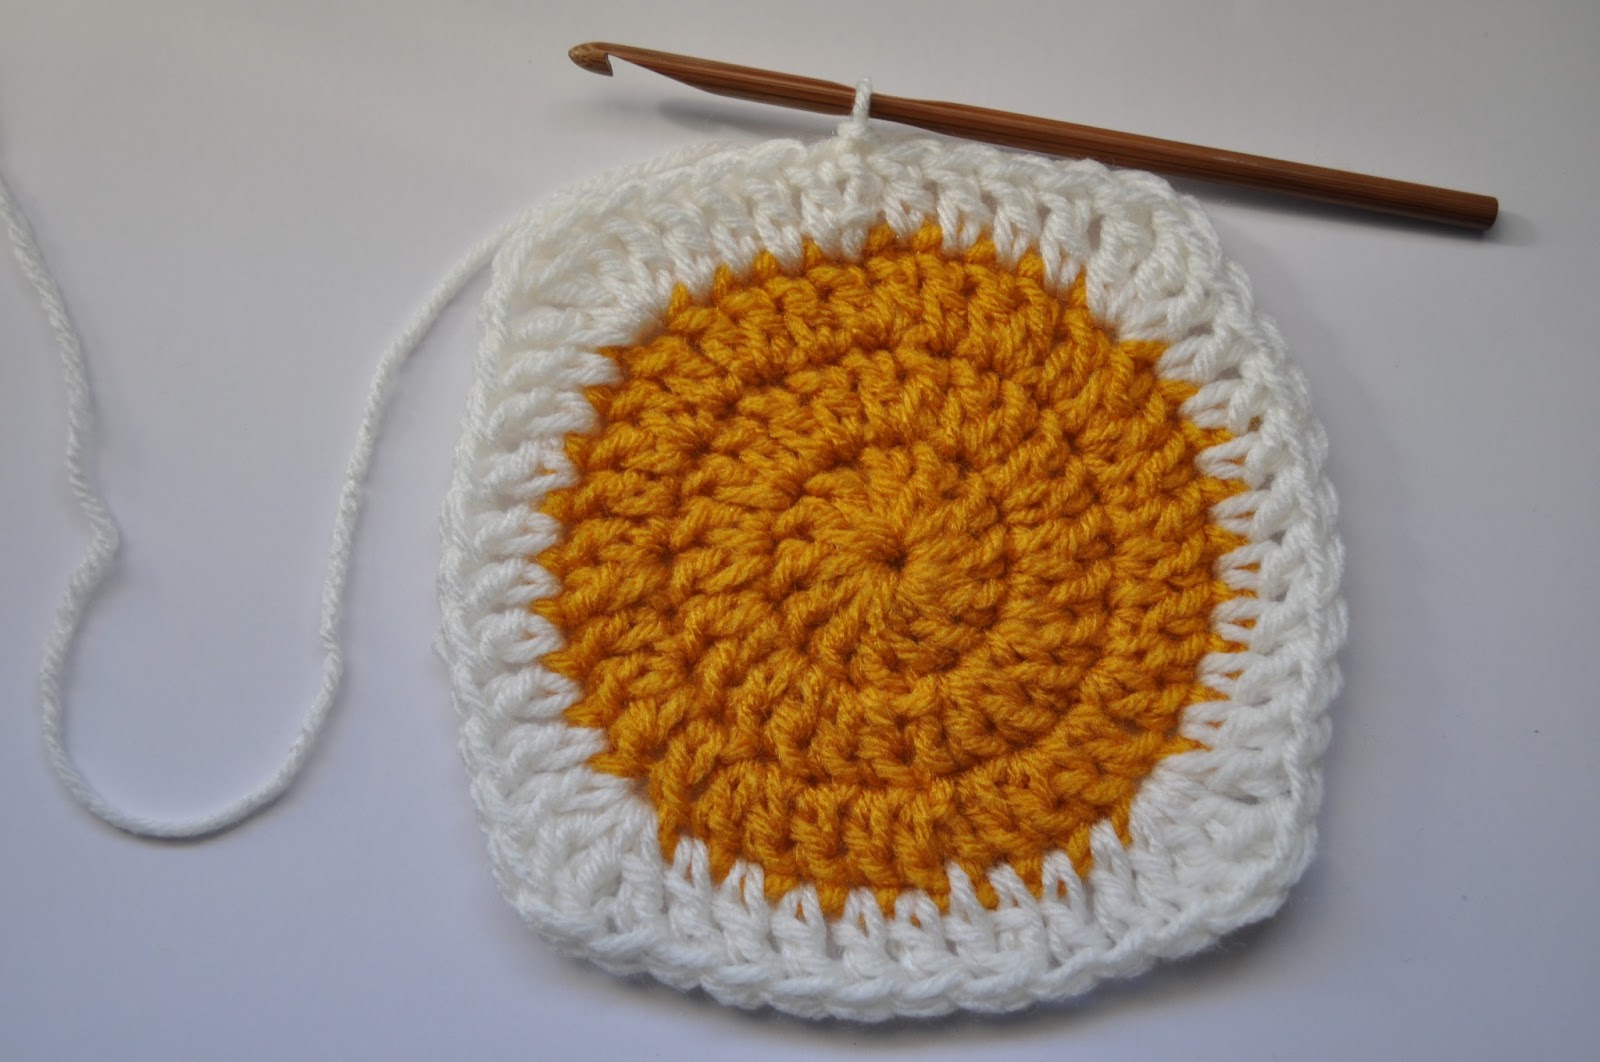
Solid Circle in Square

Hello and Happy Wednesday!!

I recently made an afghan using squares with circles inside of them.  I was originally planning to make and keep the blanket for myself, and I wanted it to be completely solid.  No toes sticking through it while cuddling on the couch!

Well, I ended up making it into a baby afghan, because I had other projects come in and I did not want this cute afghan to be cast into the pile of "I will finish it later", since I just got done finishing all of the projects I had in that pile and I do not want to start a new one!

Here is a collage of the Lollipop Circles and Squares afghan.

I was asked for the pattern on Instagram, but did not follow a pattern since I could not find a square with a prominent circle that was completely solid.  There is a similar square by Manner's Crochet and Craft that is similar.  I almost used this square, but I didn't want the hole in the middle of the circle, and I needed a bigger square (the bigger the square the less squares I would need to join).

So, I got my hook and yarn and started to experiment.

This is how I do my version of the circle in the square, granny.


You will need:
5.5 mm crochet hook
worsted weight yarn (I used Red Heart Super Saver)
scissors
needle

Abbreviations:
ch - chain
sl st = slip stitch
dc - double crochet
tr - treble crochet

Pattern:

ch 3

Row 1: 12 dc in 3rd ch from hook, sl st into first dc (12 dc)

Row 2: ch 2, 2dc in first dc and in each dc around, sl st into first dc (24 dc)

Row 3: ch 2, *1 dc in first dc, 2 dc in next dc** repeat from * to** around, sl st into first dc (36 dc)

Fasten Off
Join contrasting color with a sl st to any dc

Row 4: ch 2, 1 dc in each of the first 4 dc, *(1 dc, 2 tr, 1 dc) in next dc, 1 dc in each of the next 8 dc** repeat from *to** twice, (1 dc, 2 tr, 1 dc) in next dc, 1 dc in each of the next 4 dc, sl st into first dc 

Row 5: ch 2, 1 dc in each of the next 5 dc, *(2 dc, 1tr) in first tr, (1tr, 2 dc) in next tr, 1 dc in each of the next 10 dc** repeat from *to** twice, (2dc, 1 tr) in first tr, (1 tr, 2 dc) in next tr, 1 dc in each of the next 5 dc, sl st into first dc

Fasten off and weave in ends

Here are row by row photos.

Row 1

Row 2

Row 3

Row 4

Row 5...FINISHED!!!


~Best Wishes~


Tuesday, January 29, 2013

Easy Puffy Headband

Hello All!

I hope your week is starting out well. I wanted to share with you a pattern for a cute headband made with the puff stitch. This headband works up so quickly and is perfect to bring some sparkle to a gloomy day.


You will need:
5.0mm crochet hook
Appoximately 2 ounces of worsted weight yarn
scissors
large needle

Abbreviations:
ch = chain
sl st = slip stitch
hdc = half double crochet
PS = Puff Stitch

*If you need to learn how to do the puff stitch, please look at my free pattern for Puffing Warm Fingerless Gloves**

Pattern:

ch 60
slip stitch into first chain to form ring

Row 1: ch1, 1hdc in first ch and in each ch around, sl st into first hdc (60 hdc)

Row 2: ch 2, PS in first hdc, ch 1, skip next hdc, *PS in next hdc, ch 1, skip next hdc** repeat from *to** around, sl st into first PS (30 PS and 30 ch 1 spaces)

Row 3-6: sl st into first ch 1 space, ch 2, PS in same ch 1 space, ch 1, *PS in next ch 1 sp, ch 1** repeat around from *to** sl st into first PS (30 PS and 30 ch 1 spaces)

Row 7: ch 1, 1hdc in same space, *1hdc in ch 1 space, 1 hdc in PS** repeat around from *to** sl st into first hdc (60 hdc)

Fasten off and weave in ends

This headband can be worn as is now, or you can snazzy it up with a flower!


I added a golden flower to this teal headband. 

This headband will be part of a giveaway on my ChirpinBirdie Facebook page.
The giveaway will begin on Wednesday, January 30th 2013.

**Feel free to use this pattern for person use, and to sell.  All I ask is that you give me credit for the pattern by citing this ChripinBirdie blog.**

~Best Wishes~